Portable Imaging

Over the last few months, we’ve developed a need to image computers away from our SCCM Imaging Server so I’ve tasked myself with coming up with a solution. So far there are two, one is Ventoy and the second a “iodd” drive. Both have their advantages and disadvantages.

After overcoming challenges with both systems Ventoy has come out ahead.

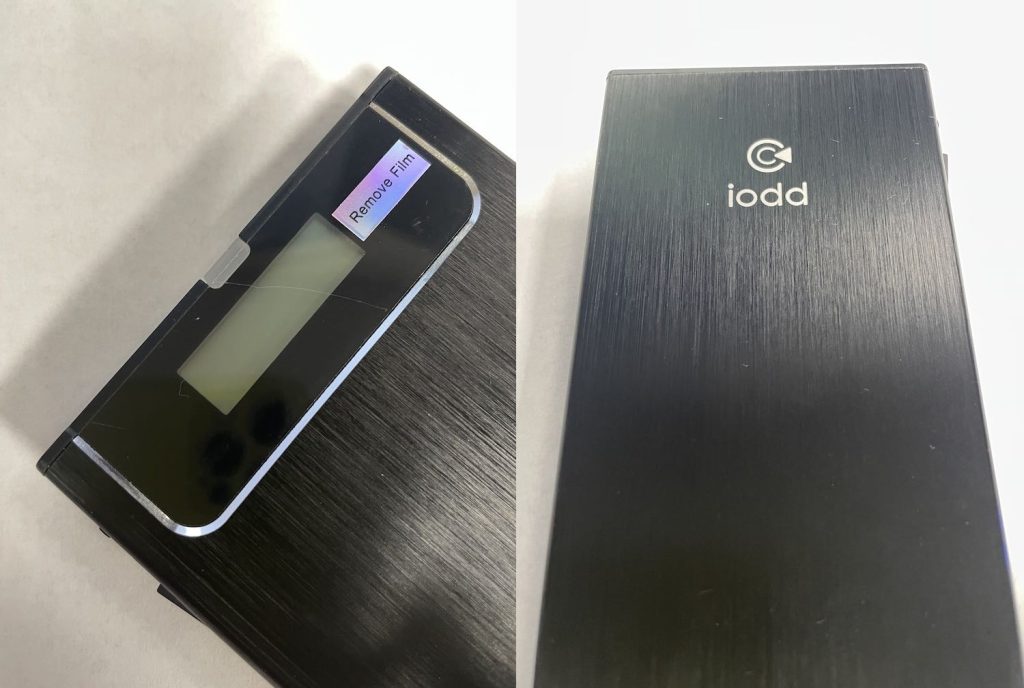
This is the Iodd2531 USB3.0 HDD SSD Virtual CD-ROM Enclosures – Made in Korea purchased from Amazon ($85.00). Basically it is a portable hard drive case with a little computer built in. It comes in two firmware versions exFAT and NTFS, both should work equally well and shouldn’t affect results. The instructions are a bit of a challenges due to language barrier. I installed a 1tb SSD, formatted as NTFS as per my firmware, created a “_iso” folder and placed some ISO’s in the folder. Making sure your computer has Secure Boot disabled in bios, you select the iso you wanna boot from using the selection switch/button on the side. Boot computer using F12, select the drive, and wait.

Ventoy, works pretty much the same way, but easier.

We installed 500 gb SATA SSD drives, in POSUGEAR 2.5” Clear External Hard Drive Case ($6) just for uniqueness.

Then you download, install and run Ventoy. It’ll setup your select drive for use. You then add a folder called “_iso” and copy your iso’s to the folder. As with Iodd drive, you have to disable Secure Boot in the bios. Again, just boot using F12, select your drive. The system will boot and display a list of bootable iso, for your selection.

The hardest part was figuring how how and when to partition and format the iso data drives, and how to disable Secure Boot.
Dade Atari Users Group – DAUG

Was one of the founders and long time supporter of DAUG. We had a vast collection of shareware and freeware that we would exchange with our members. In trying to keep things interesting and get more people into programming I would try to write a new Menu for each new disk. Showing off Atari features and new things we learn about your computers.

I’ve been trying to find my old friends from those day, to see if I could convert the library over to emulator usable files, so if you are one of those people, please reach out to me.

Never been a big fan of WordPress, but I am going to try and provide a link to the file, an image of the menu and a list of the files on the disk.

Synology NAS DS419Slim

Provide information and insights into new NAS. (TO DO)

DS419Slim

After a few months using the drive, I can now report on its overall operation.

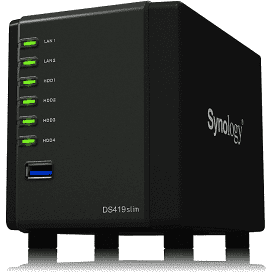
One, don’t let the photos on Amazon fool you, this is a MINI NAS which uses laptop drives, not the normal desktop drives. Which was surprising when it arrived. Plus the description said it came with drives, but didn’t. Amazon likes to embellish its descriptions and mix all the “like”/”similar” drives. So don’t bother reading them, get your reviews elsewhere.

After the second order with drives arrived, install and setup was easy. Left the drives formatting/partitioning overnight. It comes with internet access to manage, configure and monitor.. HOWEVER, it isn’t free, SURPRISE. Locally accessing, does work and is free.

There are two pieces of software that can be installed on Synology Cloud Station Backup and Synology Cloud Station Drive. Station Backup does a backup as is per configured on each station. Station Drive syncs file as they are opened and closed. Users complained of slower computers, but was kind of expected.

You log into the NAS with each users account and can recover files easily. I don’t expect users to be able to do this.

Plex, PlexConnect and OpenPlex

Over the last couple of years my family has ripped every movie we own and stored it on a Mac Mini Server with a 4th drive attached. Using Plex and a number of plugins and add-ins, almost every device brought into the house can connect. It has been fantastic. Except.

Plex, do not work on the AppleTV. Until now! We were finally able to install PlexConnect and can now watch our movies on TV’s with AppleTVs connected. There are a couple of short falls.

1) the PlexConnect is started up using Terminal, not everyone in the house is tech savvy.

2) PlexConnect can’t easily be restarted if the system is restarted due to power loss.

Obstacles  had to be overcome included, we have been running Plex on a Mac mini server, PlexConnect won’t run on a server since the ports are already in use. We had to install another copy of Plex on an old iMac, connect that copy of Plex  it to the PlexServer  on the Mac Mini. then installed PlexConnect on the Mini everything worked fine. Oh and you need to install Certificates. There are so many different ‘instructions blogs” on how to install Plexconnect it was difficult to work out the proper install. Basically I just put down all the other instructions and tried to figure out what the end result was and why it didn’t work. Two plex servers, linked to the same data, install certificates and DON’T use a server. Bingo!

Then I wanted to find a way to restore PlexConnect in case of power loss while I was away from home. Due to bandwidths limits (by at&t) it is better for everyone if we are going to watch movies we already own, that we use local copies. (Rather than downloading it AGAIN and AGAIN.. Say ‘Frozen’ for a two year old!)

So started to work out writing a startup program in LiveCode, and ran across a program called OpenPlex. Spent a couple of hours playing with it, but it needed a lot of ‘support’ software installed. I am using an older model iMac running 10.6, and it was getting to be more of a pain to use OpenPlex than to write my own program that would just work..

I’ll keep everyone up-to-date on my progress and provide a link to the finished product when completed.

Have a great day.