Raspberry Pi and Cron

After two days of attempting to get Cron to execute tasks (in this case shell scripts) on a Raspberry PI, I finally got it working.

I must have read at least three dozen sites and all my Raspberry Pi books in my attempts, nothing work..

Here are some of the suggestions I found.

This one states it will edit the users cron file:

pi@raspberry ~ $ crontab -e

This one states it will display all the users schedule cron tasks:

pi@raspberry ~ $ crontab -l

I did find these useful:

pi@raspberry ~ $ /etc/init.d/cron stop

pi@raspberry ~ $ /etc/init.d/cron start

pi@raspberry ~ $  /etc/init.d/cron restart

But none triggered my script to run, then in my notes, from a past project I found:

pi@raspberry ~ $  sudo nano /etc/crontab 

This allowed me to edit the system cron task list..

———————————————–

# /etc/crontab: system-wide crontab

# Unlike any other crontab you don’t have to run the `crontab’

# command to install the new version when you edit this file

# and files in /etc/cron.d. These files also have username fields,

# that none of the other crontabs do.

SHELL=/bin/sh

PATH=/usr/local/sbin:/usr/local/bin:/sbin:/bin:/usr/sbin:/usr/bin

# m h dom mon dow user  command

17 *    * * *   root    cd / && run-parts –report /etc/cron.hourly

25 6    * * *   root    test -x /usr/sbin/anacron || ( cd / && run-parts –repo$

47 6    * * 7   root    test -x /usr/sbin/anacron || ( cd / && run-parts –repo$

52 6    1 * *   root    test -x /usr/sbin/anacron || ( cd / && run-parts –repo$

10 * * * * pi cd /home/pi && ./jabberfix.sh

#

———————————————–

The last task, which runs at 10 minutes after the hour, for user pi, fixes my jabber connection.

Honestly, I have no clue what the other tasks are doing. More research! But I am very happy I now know how to add my own tasks to cron.

Enjoy

~David


Thoughts to Ponder – CompuCarve

Purchased a Craftsman CompuCarve a few years back. Made a few signs and awards for staff members. Nice Machine, however it is LOUD. Wife didn’t like me using it. So put it away until last month. Learned I could use it as a object scanner, plus I had a few sign requests.

Was able to make 6 signs and the machine stopped working. Took the machine apart to clean, and found the problem. Seems there is a shaft that goes along the bottom of the machine to make sure both sides raise and lower at the same rate. Makes sense. However the shaft is held in place by two screws with washers held in place by plastic… The plastic broke on one screw making the machine unusable… Where did American workmanship go? I can not recommend this machine to anyone, and it was expensive. Wrote the company two emails asking if I could buy a replace part (the base).. No reply to either email. Another reason I can’t recommend this machine.

This has sadden me, I had great plans for this machine in building cases from Raspberry Pi’s, and desk stands for the office.

———————————————-
UPDATE
———————————————-

After two weeks and two emails I finally got a reply on repairing the CompuCarve. Their solution is to put a bigger/longer screw in the hole. I laughed at the lady on the phone, are you kidding. “No this is how we just fixed one on the floor in for repair”.

Needless to say I will not be following their directions and come up with my own repair.

——————————————————

Highly recommend sponsoring projects on http://www.Kickstarter.com.

Solidoodle 3, first and second impressions.

Building and creating my own creations has always been a fault of mine. Most of the creations were built from wood or scrapes of whatever was laying around. But then came 3D printers, the ability to print almost anything you could draw. A dream come true!?

A couple of years ago I purchased one of the first 3D printers (MakerBot) for myself and my stepson for Christmas. It took a couple of weeks to put together and align. Then came printing. Nothing ever printed as well as photos online. We spend MONTHS playing with alignments and settings, never quite right. So after two years, I gave up. Decided to try a new less expensive printer the Solidoodle.

When I ordered, a note said 4-8 weeks. Little did I know that it was really 6 months or more. Ordered September 2012, received February 2013. But in all honesty, while waiting for my Solidoodle 2, the Solidoodle 3 came out. An impressive 8 x 8 print area and only $100 additional, I was in.

Figured with all the talk of ease of printing and the nice metal case, it would be a plug and play operation. It would be aligned at the factory and shipped ready to use to your home.

Boy was I wrong. Plus the more play with it the more I see it is by no means a better printer. The print head break easily. If you run out of filament mid print, you have to take apart the print head, risking breaking it (Keep a few on hand!!!)

The software seems nicer than the MakerBots, but since I am yet to be able to print anything it is difficult to say.

Over the next few months I will continue my efforts and report my findings to this blog.
~David

Death of a Weather Station

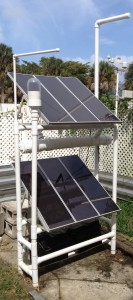
One of our projects last year was a weather station, it was built in Miami and transported to Tennessee and installed.

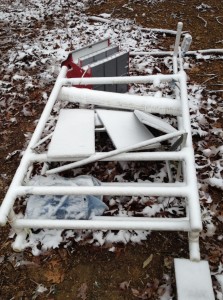
The weather station worked stand alone, away from all buildings using solar panels. It transmitted all information to the servers using 60 mW XBees. The information was then put on the web. The system worked great until a freak wind storm blew through and knocked it over. Luckily we were scheduled to return to the site within two weeks.

At first we thought the station was vandalized,  none of our remote cameras had a great view of the station, all we could tell was it was down. None of our cameras recorded anyone near the station during daylight hours (and when the sun goes down, it is DARK. And had someone approached the station at night with flashlights we would have caught that as well. But nothing.)

When we arrived on-site, to our amazement all the hardware survived. The solar panels had minor cracks, but that was on their backsides. Wires had been ‘snapped’, easy to patch. And all other hardware was still weather tight and undamaged. We did have to removed the station until next season, giving us time to build a new stand/tower. (It was below freezing for our visit and I was happy we didn’t have to return the station to operation during that visit.)

So a thanks to SparkFun for selling such robust hardware. … And back to the drawing board for a better stand/tower.

WeatherStationNumber1 Before Install WeatherStationNumber1bDamage Results

Final Report:

This WAS Weather Station #1.. There was an attempt to add a remote control camera (note: glass dome), but at the last minute it was dropped. It was dropped because we could not get the programming, the added hardware and custom parts made in time. Perhaps Weather Station #2.

Other flaws were that stand was to narrow. The installed station only had the lower solar panel installed (not the dual panels as in the photo), but that exposed the Electronics Tube to direct sunlight (and heat build up). We placed a large bird house over the Electronics Tube, which helped with the heat issue.

Recommendations: Lower electronics tube, widen the over stance of stand. Full concrete footing would be nice, if possible, otherwise wide heavy sleds.

We did have ropes tied to blocks the keep the stand upright, which seem to work. However the ropes rotted. – More pre-install tests.